
9 Ways to Make a Builder-Grade Living Room Look Custom Without Remodeling
Nine surface-level, non-structural changes that replace the flat, developer-default look with something that reads as designed on purpose
Most living rooms in newer or production-built homes share a specific, recognizable look, flat white or beige walls, plain flat-panel doors, thin builder-grade trim, a single ceiling fixture, and no real architectural detail anywhere in the room. None of it is wrong, exactly. It's just generic, built to a cost target rather than to a specific aesthetic, and it tends to make every room in the house look interchangeable with every other room of the same size in a different house entirely.
The instinct, once that flatness starts to bother someone, is to assume the fix is a remodel, moved walls, custom millwork, an architect. In the vast majority of builder-grade living rooms, it isn't. What's actually missing is detail: trim profile, contrast, hardware finish, a ceiling that does something, doors that read as more than a flat slab. All of that can be added on top of what's already there, without touching drywall structurally or changing the room's footprint at all.
This article walks through nine of those changes in detail: what's actually flat about the space, why it's easy to overlook, exactly how to add the detail back in, what it costs, and why it works. None of these require a permit, a contractor crew, or moving a single wall. What they require is treating the room's bones, trim, doors, ceiling, hardware, as worth finishing, the same way a builder would have if the home had been custom rather than production-built.
A brief, honest note before diving in: the dollar figures below are realistic, checkable, current mid-range retail estimates for the categories of material described, not a receipt from one verified project. The techniques and reasoning are genuine and worth trusting as a planning benchmark; the "before" scenes are composite, illustrative situations representative of the kind of builder-grade room most people are actually starting from, not a documented account of one particular house.
One more thing worth naming upfront: none of this replaces an actual remodel if the room has a genuine layout problem, an awkward traffic flow, a load-bearing issue, water damage, or failing electrical. Those are structural problems worth solving with a contractor first. What these nine changes are built for is the far more common situation: a room that's fundamentally sound and reasonably laid out, but was finished to the minimum standard and never taken a step further.
Table of Contents
- Add Picture-Frame Wall Molding
- Paint the Trim and Doors a Deliberate Contrast
- Swap Switch Plates, Outlet Covers, and Vent Registers
- Replace the Single Overhead Fixture
- Add Craftsman-Style Casing Around Windows and Doors
- Fake a Built-In With Flanking Shelving
- Upgrade Every Interior Door Handle and Hinge
- Treat the Ceiling as a Fifth Wall
- Add a Substantial Baseboard
- Why These Nine Work Together
- The Five Underlying Principles
- How This Compares to an Actual Remodel
- What This Won't Fix
- Adapting for Renters vs. Homeowners
- Staying Under Budget
- Common Mistakes
- Which Change to Start With
- Full Cost Breakdown
- Common Questions
Add Picture-Frame Wall Molding

The problem: a flat, featureless wall with no molding at all is one of the single most reliable signals of a builder-grade room, and it's also one of the fastest to fix without any drywall work. Picture-frame molding, thin strips of trim applied directly onto the existing wall in a grid of rectangles, is a purely surface-level addition, no demo, no structural change, just trim glued and nailed onto a wall that's already there.
This single change is arguably the highest-impact item on this entire list relative to its cost, since it introduces the one thing a flat production-built wall is almost always missing entirely: dimension and shadow. Even in flat white paint, a wall broken into a grid of shallow raised rectangles reads as architectural rather than default the moment light hits it.
| Item | Cost |
|---|---|
| Pre-primed MDF trim strips, one accent wall | $85 |
| Construction adhesive and finish nails | $15 |
| Paintable caulk and wood filler | $10 |
| Paint, quart, matching wall color | $18 |
| Total | $128 |
- Measure the wall and sketch a grid of rectangles on paper first, keeping consistent spacing between each frame and equal margins from the ceiling, floor, and any outlets or switches.
- Mark the layout lightly on the wall with a level and pencil, checking that horizontal and vertical lines stay true across the whole wall before cutting any trim.
- Cut the trim strips to length with mitered forty-five degree corners on a miter saw, dry-fitting each rectangle before gluing anything permanently.
- Apply construction adhesive to the back of each strip and press into place along the marked lines, securing with a few finish nails to hold it while the adhesive sets.
- Fill nail holes and any seams with wood filler, then run a thin bead of paintable caulk along every inside edge where the trim meets the wall for a seamless, factory-built look.
- Prime any exposed filler or caulk, then paint the entire wall, trim included, in one consistent color, painting over the seams is what makes the grid read as built-in rather than applied.
The result: the same wall, same room dimensions, but a surface that reads as custom millwork instead of a flat, featureless builder wall.
- Wall molding is one of the most recognizable signals of custom, higher-end construction in any home
- Shadow and dimension from the raised trim read as architectural even in a single flat paint color
- It's a weekend project using materials available at any hardware store, not a specialty trade
Search terms: "picture frame molding trim," "MDF wall trim pre-primed," "paintable caulk trim"
Paint the Trim and Doors a Deliberate Contrast
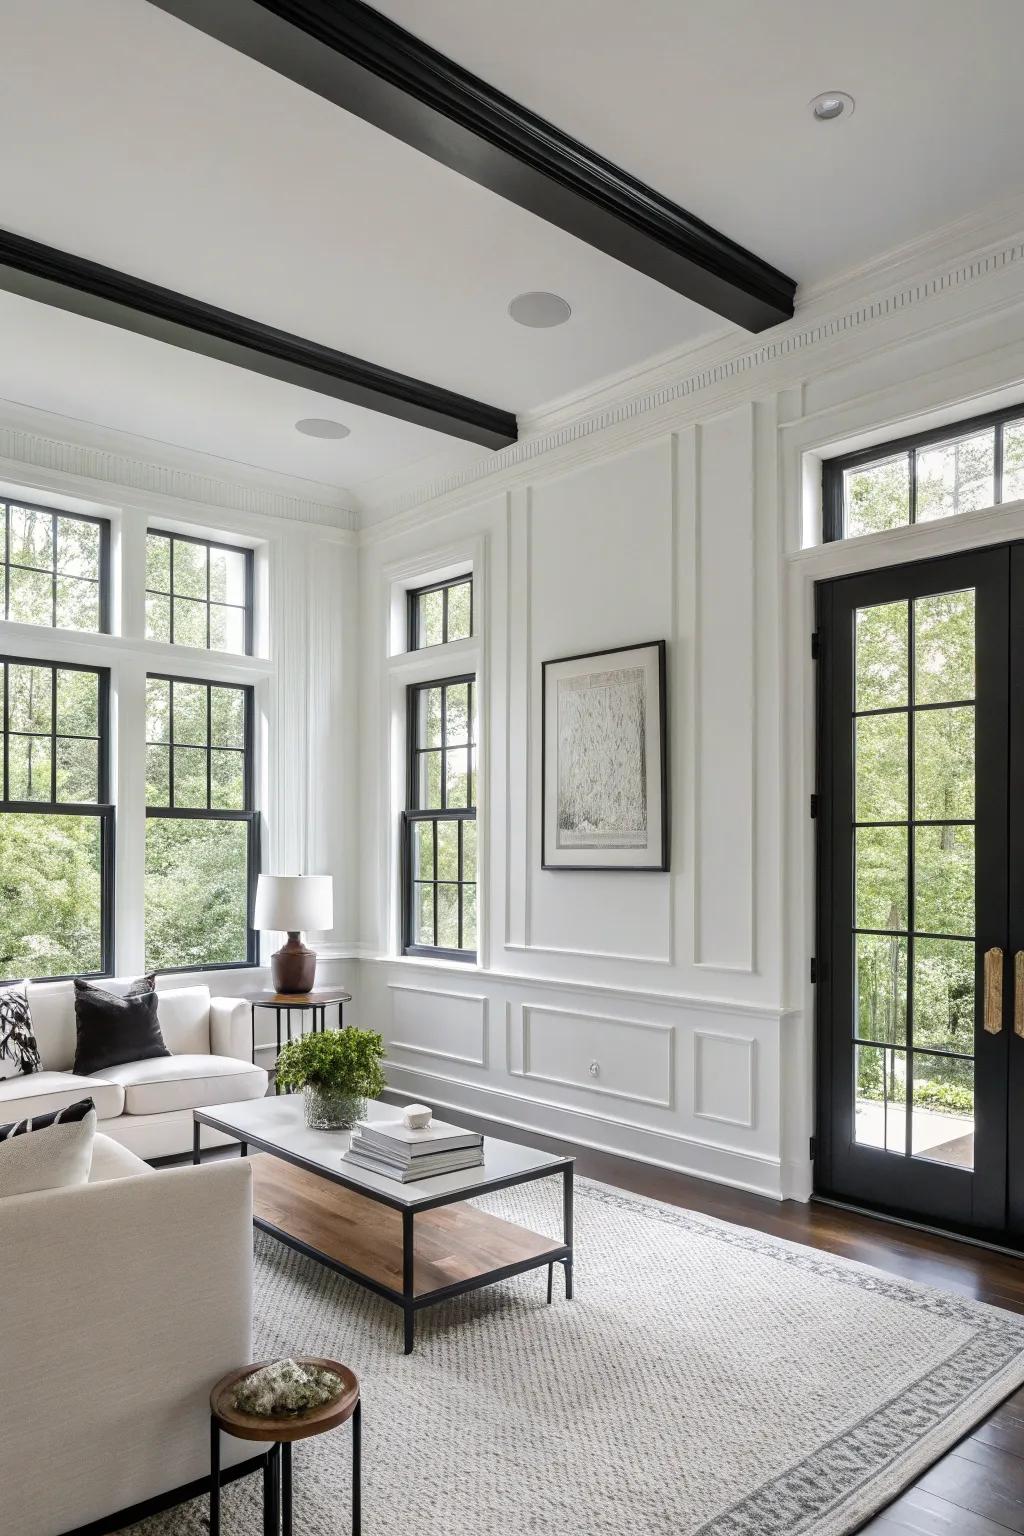
The problem: builder-grade homes almost universally paint every piece of trim, baseboards, door casing, and the doors themselves, the same flat, slightly off-white as the walls, or a single generic white regardless of the wall color. The effect is a room with no defined edges, where trim, walls, and doors all blur together into one undifferentiated surface.
A deliberate contrast, a crisp true white trim against a deeper wall color, or a bold dark trim and door color against a lighter wall, does something a single flat color scheme never can: it defines the architecture of the room. Door casing, baseboards, and the doors themselves suddenly read as intentional details rather than background elements nobody was ever meant to notice.
| Item | Cost |
|---|---|
| Trim and door paint, semi-gloss, one gallon | $42 |
| Painter's tape | $8 |
| Angled sash brush | $9 |
| Total | $59 |
- Choose one of two directions, a crisp, true white or off-black trim against colored walls, or a single bold, saturated color used on both trim and doors against neutral walls, mixing several trim colors in one room rarely reads as intentional.
- Clean all trim and door surfaces thoroughly before taping, existing grease and dust are the most common reason new paint doesn't adhere evenly on high-touch surfaces like doors.
- Tape off the wall edge along every piece of trim carefully, since the clean line between wall and trim color is what makes this change read as deliberate rather than sloppy.
- Use a semi-gloss or satin finish rather than flat paint on trim and doors specifically, the added sheen is what separates trim visually from the flatter wall paint even in a similar color family.
- Paint doors with their hardware removed where practical, working in long, even strokes with the grain of any paneling, and let each coat fully cure before rehanging.
- Apply a minimum of two coats on all trim and door surfaces, since these areas see more direct light and touch than walls, and a single coat rarely provides full, even coverage.
The result: the same walls, same doors, same trim profile, but a room with clearly defined architectural lines instead of one undifferentiated surface.
- Color contrast between trim and walls is a defining feature of most professionally designed rooms
- Semi-gloss trim paint catches light differently than flat wall paint, adding depth at no extra cost
- It's a paint-only change, fully reversible and low-risk compared to structural trim additions
Search terms: "semi gloss trim paint," "interior door paint," "painter's tape trim edge"
Swap Switch Plates, Outlet Covers, and Vent Registers

The problem: nearly every builder-grade home ships with plain white plastic switch plates, outlet covers, and floor or wall vent registers, small, easily overlooked details that are nonetheless visible constantly throughout the room, at eye level on every wall, on the floor, everywhere a hand naturally reaches. Left in cheap white plastic, they quietly undercut every other upgrade made to the room around them.
This is one of the least expensive changes on the entire list and one of the most consistently overlooked, since these items are small enough that most people stop consciously seeing them within days of moving in, even though they're touched and glanced at more often than almost anything else in the room.
| Item | Cost |
|---|---|
| Switch plate and outlet cover set, matching finish | $28 |
| Floor or wall vent registers, matching finish | $34 |
| Total | $62 |
- Turn off power to the relevant switches and outlets at the breaker before removing any existing cover plates, this is a basic but essential safety step.
- Remove the old plastic plates and set them aside, most use a single visible screw at the top and bottom that a standard screwdriver handles directly.
- Choose one coordinated finish, matte black, brushed brass, or brushed nickel are the most common choices, and use it consistently across every switch and outlet in the room.
- Attach the new plates using the included screws, checking that each sits flush and level against the wall before moving to the next.
- For vent registers, measure the existing opening carefully before ordering replacements, sizing mismatches are the most common issue with this specific swap.
- Unscrew and lift out the old plastic register, drop in the new one, and secure with the provided screws, floor registers in particular make an outsized visual difference given how much floor space they typically cover.
The result: the exact same electrical setup, but a room where dozens of small, constantly visible details finally match and coordinate instead of standing out as plain white plastic.
- These are among the most frequently seen and touched details in any room, small changes here compound visually over time
- A coordinated finish ties directly back into any hardware or lighting finish chosen elsewhere in the room
- It's one of the cheapest single-category swaps on this entire list relative to how often it's noticed
Search terms: "matte black switch plate covers," "brushed brass outlet covers," "floor vent register replacement"
Replace the Single Overhead Fixture

The problem: the standard builder-grade overhead fixture, a plain flush-mount dome or a basic multi-bulb fixture, is one of the most recognizable signals of a production-built home, largely because it's usually the cheapest fixture that met code, not one chosen for how it actually looks in the room.
Swapping the fixture itself, rather than just changing bulbs or adding lamps, directly replaces the one detail overhead that a passing glance registers instantly. This is a slightly more involved change than most on this list since it does involve basic electrical work, but it stays well within the definition of a swap rather than a remodel, no new wiring, no moved boxes, just a different fixture on the same existing electrical box.
| Item | Cost |
|---|---|
| Flush-mount or semi-flush fixture, upgraded style | $95 |
| Wire nuts and electrical tape | $6 |
| Total | $101 |
- Turn off power to the fixture at the breaker and confirm it's off with a non-contact voltage tester before touching any wiring.
- Remove the existing fixture, noting which wires connect where, typically matched by color, black to black, white to white, and a bare or green ground wire.
- Check the fixture box for a compatible mounting bracket, most new fixtures include a universal bracket that fits standard electrical boxes without modification.
- Connect the new fixture's wires to the matching existing wires using wire nuts, twisting each connection securely and tucking them neatly into the box.
- Mount the new fixture to the bracket following the manufacturer's instructions, then restore power and test before fully securing any decorative cover.
- Choose a style that suits the room's ceiling height and scale, a fixture that's too small for the room reads as an afterthought just as much as the plain original did.
The result: the same ceiling box and the same room, but an overhead fixture that reads as chosen rather than defaulted to.
- The overhead fixture is one of the first things a glance upward registers in any room
- A fixture scaled properly to the room's ceiling height reads as considered rather than an afterthought
- It uses the exact same electrical box and wiring already in place, no new infrastructure required
Search terms: "flush mount ceiling light living room," "semi flush ceiling fixture," "non contact voltage tester"
Add Craftsman-Style Casing Around Windows and Doors
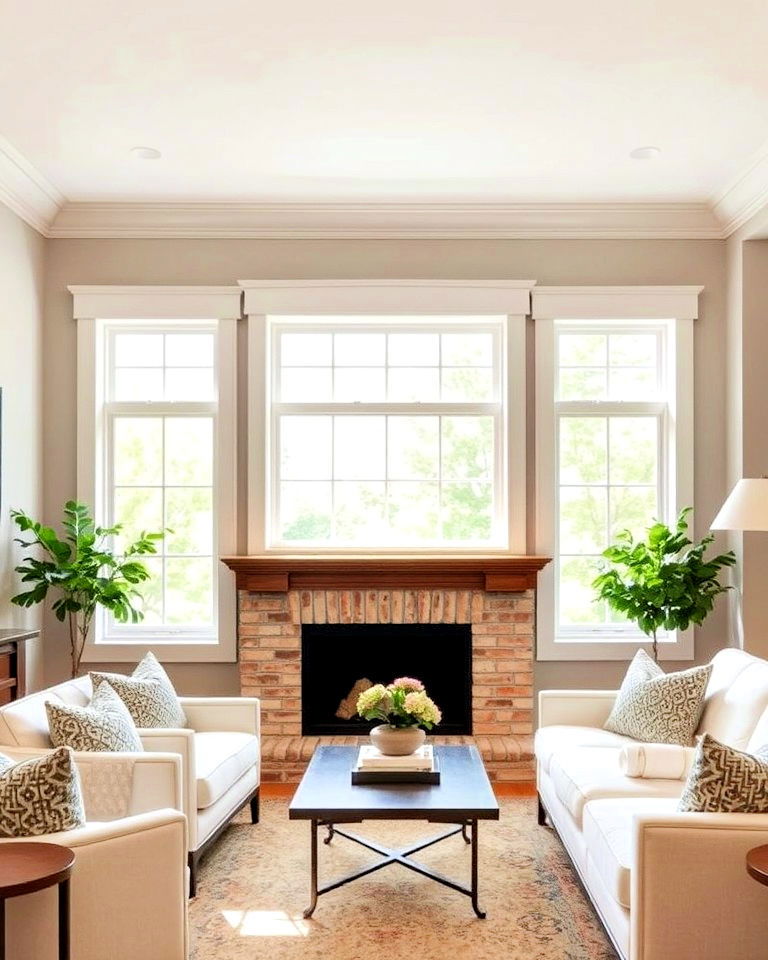
The problem: builder-grade window and door casing is almost always the thinnest, plainest profile available, a flat strip barely wider than the drywall gap it covers, chosen because it's inexpensive and fast to install at scale, not because it adds any visual weight to the opening it surrounds.
Thicker, more substantial casing, especially a craftsman-style build-up with a flat head casing and a small shelf detail on top, is a purely surface-level swap over the existing window or door opening. It doesn't change the size of the opening at all, just the trim framing it, and it's one of the more visually significant upgrades on this list because windows and doors are, by definition, focal points the eye already goes to.
| Item | Cost |
|---|---|
| Wider primed casing, one window or door | $45 |
| Craftsman head cap and shelf trim | $18 |
| Finish nails and wood filler | $8 |
| Total | $71 |
- Carefully remove the existing thin casing with a pry bar, working slowly to avoid damaging the surrounding drywall, which will be reused as the backing for the new trim.
- Measure the opening and cut the new, wider side casing pieces to length, mitering or butt-jointing the corners depending on the style chosen.
- Nail the side casings into place first, checking for level and even reveal along the window or door jamb before moving to the top.
- Cut and install the flat head casing piece across the top, followed by the small craftsman shelf cap on top of that, this stacked detail is what gives the style its recognizable, slightly architectural look.
- Fill all nail holes and seams with wood filler, sand smooth once dry, and caulk any remaining gaps between the trim and the wall.
- Prime any filled or bare wood and paint to match the trim color chosen for the rest of the room, tying this detail back into the broader trim scheme.
The result: the same window and door openings, same glass, same door, but a frame around each that reads as substantial and architectural instead of the thinnest trim option available.
- Substantial casing is one of the clearest, most recognizable signals of custom-built or renovated homes
- Windows and doors are natural focal points, upgrading their frame has an outsized visual return
- The opening itself never changes, keeping this firmly a cosmetic swap rather than a structural project
Search terms: "craftsman window casing kit," "wide door casing primed," "head cap trim craftsman"
Fake a Built-In With Flanking Shelving
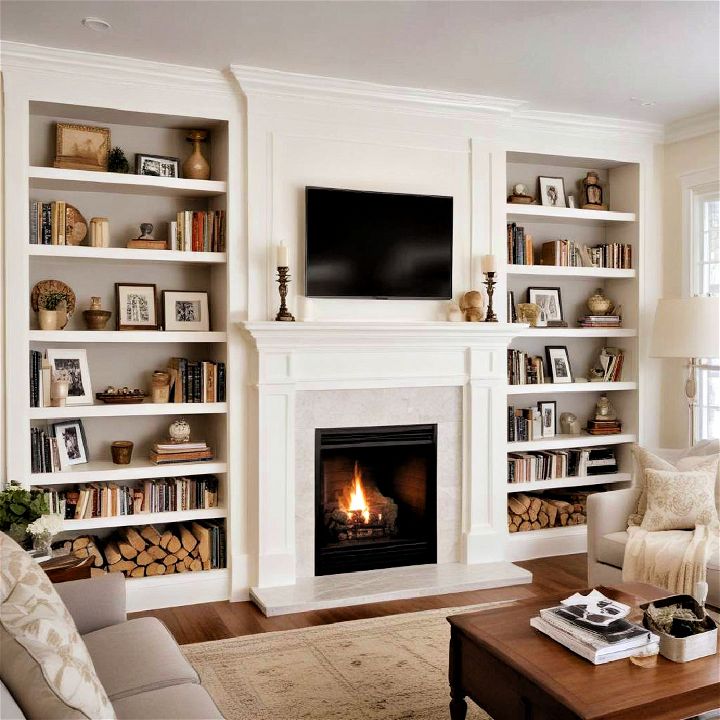
The problem: a genuinely custom-built home often has real built-in shelving or cabinetry flanking a fireplace or a TV wall, a detail production homes almost never include because it adds real construction cost. Left without it, that same wall usually just gets a piece of freestanding furniture pushed against it, if anything at all, missing the architectural, "this was designed for this exact wall" feeling built-ins create.
Stock bookshelves, chosen at the right height and pushed flush against the wall on either side of a TV or fireplace, with a bit of styling and trim detail added, come remarkably close to that built-in look without any actual carpentry or cabinetry work.
| Item | Cost |
|---|---|
| Pair of matching tall bookshelves | $180 |
| Trim cap to bridge shelf tops to the wall | $25 |
| Paint to match trim color | $16 |
| Total | $221 |
- Choose two identical, tall bookshelves sized to flank the fireplace or TV wall symmetrically, matching height matters more here than any other single decision.
- Position each shelf flush against the wall, pushed as close to the corner or fireplace surround as physically possible to eliminate any visible gap.
- Secure each shelf to the wall with an anti-tip strap for safety, this is standard practice for any tall furniture and doesn't affect the finished look.
- Add a thin trim cap across the top of each shelf, running from the shelf's back edge to the wall, to visually close the gap between the furniture and the wall itself.
- Paint the trim cap and, optionally, the shelf frames themselves to match the room's trim color, this single step does more than anything else to make the shelves read as built rather than placed.
- Style the shelves with a mix of books, small objects, and some open negative space, an evenly filled but not overstuffed shelf reads as more intentional than either extreme.
The result: the same wall and the same fireplace or TV, but a flanking pair of shelving that reads as an intentional architectural feature rather than furniture that happened to end up there.
- Flanking symmetry is one of the most recognizable signals of custom millwork in any living room
- The trim cap detail alone is what closes the visual gap between "furniture" and "built-in"
- It adds genuine storage and display space alongside the visual upgrade, unlike most purely decorative changes
Search terms: "tall bookshelf pair matching," "shelf trim cap molding," "anti tip furniture strap"
Upgrade Every Interior Door Handle and Hinge

The problem: builder-grade interior doors almost universally ship with the same plain, polished brass or dull chrome knob and matching hinges throughout the entire house, hardware chosen entirely for cost rather than style, and rarely coordinated with anything else in the finished room.
Swapping door handles and hinges is a small, contained project per door, but the visual return compounds across every doorway in and around the living room, since hand-height hardware is touched constantly and sits at a natural eye-level focal point every time a door is used.
| Item | Cost |
|---|---|
| Door lever or knob sets, matching finish, per door | $26 |
| Matching hinge sets, per door | $14 |
| Total (per door) | $40 |
- Remove the existing door knob by unscrewing the visible mounting plate on each side, most standard residential doors use the same universal backset spacing.
- Check the backset measurement, the distance from the door's edge to the center of the knob hole, before ordering new hardware to confirm compatibility.
- Install the new knob or lever set following the included instructions, most modern sets are designed for straightforward drop-in replacement with no additional drilling.
- Remove one hinge at a time, rather than all three at once, to keep the door supported throughout the swap, replacing each with a matching finish hinge before moving to the next.
- Choose a single finish, matte black and brushed brass are the two most common choices, and use it consistently across every door in and immediately around the living room.
- Check that each door still closes and latches properly after the hardware swap, a hinge swap can occasionally require minor adjustment if the new hinges differ slightly in thickness from the originals.
The result: the same doors, same frames, but hardware throughout the space that reads as a single deliberate choice instead of whatever came standard from the builder.
- Door hardware is touched and seen constantly, making its finish disproportionately noticeable over time
- A single coordinated finish across every door ties the whole living space together visually
- It's a contained, repeatable project that can be done one door at a time as budget allows
Search terms: "matte black door lever set," "brushed brass door hinges," "interior door hardware multipack"
Treat the Ceiling as a Fifth Wall
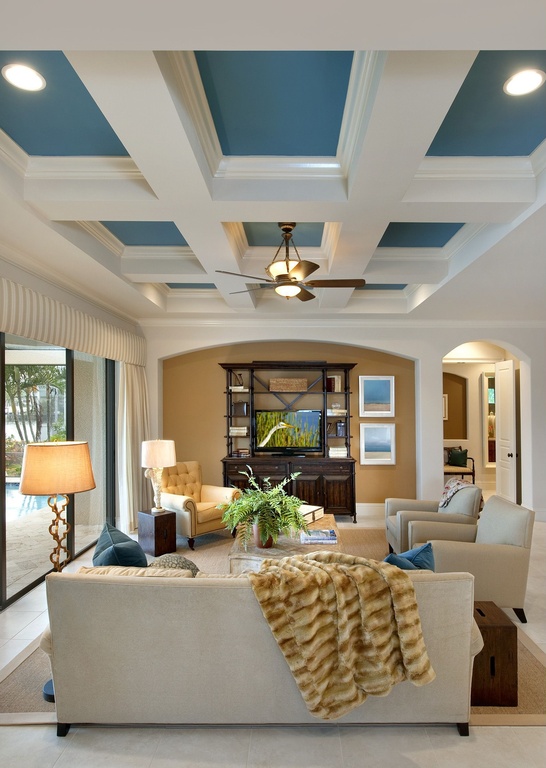
The problem: builder-grade ceilings are almost always left the same flat white as everything else, or in older builds, finished in a stippled texture nobody chose on purpose. Left untouched, the ceiling becomes a large, blank surface that goes completely unaddressed in a room where every other surface has been considered.
Painting the ceiling a soft, deliberate color, or adding a peel-and-stick wallpaper or beadboard panel to it, treats the ceiling as an actual design surface rather than an afterthought. This is a more advanced move than most on this list and doesn't suit every room, but in the right space it's one of the most memorable, distinctive changes available.
| Item | Cost |
|---|---|
| Ceiling paint, one gallon, or peel-and-stick wallpaper | $50 |
| Extension roller pole and edging brush | $14 |
| Total | $64 |
- Choose a direction based on the room's scale, a soft, muted paint color for a subtler shift, or a patterned peel-and-stick wallpaper for a bolder, more distinctive statement.
- If painting, use a flat or matte finish specifically for the ceiling, sheen on an overhead surface tends to highlight imperfections rather than looking intentional.
- Cut in carefully along the edges where ceiling meets wall using an angled brush before rolling the main surface, this edge is the most visible line in the entire treatment.
- If using peel-and-stick wallpaper, work in manageable sections, starting from one corner and using a smoothing tool to press out air bubbles as you go.
- Allow paint to fully cure before judging the final result, ceiling colors often look noticeably different once dry compared to how they appear wet or under a single coat.
- Reassess the room's lighting once the ceiling treatment is complete, a colored or patterned ceiling sometimes benefits from slightly adjusted lighting to avoid the room feeling darker overall than intended.
The result: the same ceiling height and shape, but a surface that's finally been treated as part of the room's design rather than left blank by default.
- A treated ceiling is one of the least common, most memorable details in a typical production-built home
- It signals that every surface in the room was considered, not just the ones at eye level
- Paint alone keeps this option fully reversible if the room's needs change later
Search terms: "flat ceiling paint color," "peel and stick wallpaper ceiling," "extension roller pole ceiling"
Add a Substantial Baseboard
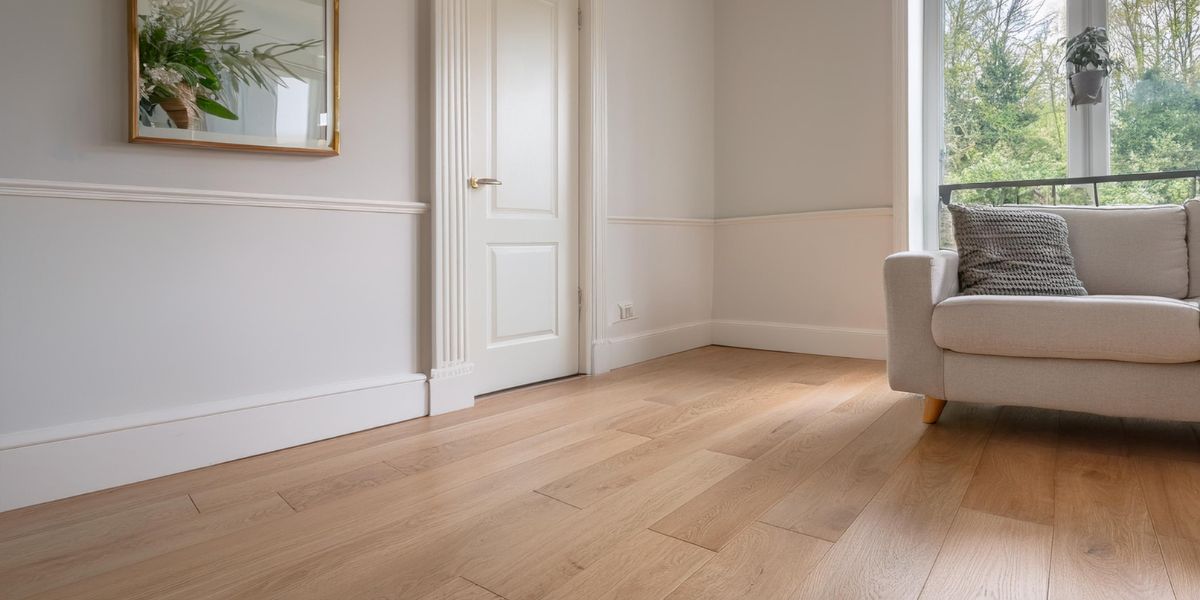
The problem: builder-grade baseboards are typically the thinnest, shortest profile available, often only two to three inches tall, chosen for cost rather than proportion. A thin baseboard leaves the transition between wall and floor looking unfinished and visually weak, especially in a room with taller ceilings where the base trim ends up looking undersized relative to the rest of the space.
Taller, more substantial baseboard, installed directly over or in place of the existing thin trim, is a purely cosmetic swap along the floor line. It doesn't touch the flooring itself, just the trim covering the gap between floor and wall, and it's one of the details that most directly signals a home was finished with genuine attention to proportion.
| Item | Cost |
|---|---|
| Taller primed baseboard, per room | $95 |
| Finish nails and wood filler | $10 |
| Paint, quart, matching trim color | $14 |
| Total | $119 |
- Remove the existing thin baseboard carefully with a pry bar, working in manageable sections and marking any studs found behind it for reference when installing the new trim.
- Measure each wall run and cut the new, taller baseboard to length, mitering outside corners and coping inside corners for the cleanest possible joint.
- Nail the new baseboard into the wall studs at consistent intervals, keeping it tight against both the floor and the wall along its full length.
- Fill all nail holes and any seams between boards with wood filler, sanding smooth once fully dry before moving to caulking.
- Run a bead of paintable caulk along the top edge where the baseboard meets the wall, this is what gives the finished trim its seamless, built-in look rather than an obviously applied strip.
- Prime any filled or bare sections and paint the entire baseboard run to match the rest of the room's trim color, tying it visually into the door casing and window trim already addressed elsewhere on this list.
The result: the same floor and the same wall, but a base trim proportioned to actually suit the room's ceiling height instead of the thinnest option a builder could install quickly.
- Baseboard proportion is one of the clearest, most consistent differences between builder-grade and custom-finished homes
- It ties directly into the door and window casing upgrades for a cohesive, whole-room trim package
- The flooring stays completely untouched, keeping this firmly a cosmetic, non-structural project
Search terms: "tall primed baseboard 5 inch," "baseboard trim MDF," "coped inside corner baseboard"
Why These Nine Work Together
Looked at individually, each of these nine changes addresses one specific, narrow gap, a flat wall, thin trim, plastic hardware, a blank ceiling. Looked at together, the pattern that matters becomes clear: none of them required moving a wall, changing the room's footprint, or bringing in a full renovation crew. Every one of them worked as a layer applied on top of what was already there, correcting proportion, finish, and detail rather than the room's underlying structure.
That's the real argument behind this whole list. A room reading as "custom instead of builder-grade" has far less to do with square footage or floor plan than most people assume, and far more to do with whether the details, trim profile, hardware finish, ceiling treatment, door casing, were ever actually finished past the minimum standard. A large, well-laid-out room with thin trim, mismatched plastic hardware, and a blank ceiling will still read as generic. A modest, ordinary room with substantial trim, coordinated hardware, and a considered ceiling reads as considerably more custom than its footprint alone would suggest.
The Five Underlying Principles
- Add dimension, don't just add color: molding, casing, and taller baseboard all work by giving flat surfaces actual shadow and depth, not by changing what color they are.
- Small, repeated details compound: switch plates and door hardware seem minor individually but appear dozens of times throughout a room, coordinating them has an outsized cumulative effect.
- Every surface counts, including the ceiling: a room where only the walls were considered still reads as unfinished, treating every surface, including overhead, is what separates custom from default.
- Proportion matters more than material: taller baseboard and wider casing made from inexpensive primed MDF outperform thin trim made from pricier material, scale is doing the visual work, not cost of material.
- Cosmetic layers over structure, not instead of it: every change on this list sits on top of the existing wall, floor, or ceiling rather than replacing it, keeping the whole project non-structural by design.
How This Compares to an Actual Remodel
It's worth being direct about the gap between these nine changes and an actual living room remodel, since that gap is the real substance behind the claim that a custom look doesn't require one. A genuine remodel, moved walls, new flooring, custom cabinetry, an architect and permits, commonly runs into five figures once labor, materials, and design fees are all included, even for a single, moderately sized room. The nine changes above, done entirely on your own, land in the range of roughly eight hundred to nine hundred dollars total if every single one is done at once, and considerably less if trimmed to the highest-impact items only.
That comparison isn't meant to suggest a remodel is never worth it, a room with a genuinely awkward layout or a structural limitation may reasonably need one. It's meant to show that the specific, common complaint, "this room looks builder-grade", is very often about trim, hardware, and finish detail, not about the room's actual layout or square footage.
What This Won't Fix
None of these nine changes address a genuinely awkward floor plan, a load-bearing wall in the wrong place, or a room that's simply too small for how it's being used. Those are architectural problems, and no amount of trim or hardware changes the actual dimensions or layout of a room. If the living room has a real structural or functional issue, that's worth solving with a contractor before any of the cosmetic layers above.
These changes also won't fix failing electrical, water damage, or a ceiling with an actual structural problem behind the drywall. Those need to be addressed on their own terms first. What these nine changes solve is the much more common, much more fixable category: a room with a sound structure and a workable layout that was simply finished to the minimum standard and never taken any further.
Adapting for Renters vs. Homeowners
The switch plate and vent register swap, the flanking shelving, and the ceiling wallpaper option are all fully renter-friendly, since none of them involve permanent alteration to the wall, trim, or paint the landlord is responsible for, original hardware and covers can simply be saved and reinstalled at move-out.
The wall molding, trim paint, casing, door hardware, and baseboard changes are more homeowner-oriented projects, since they involve modifying the trim and paint a landlord typically controls. Renters interested in these specific changes should check their lease and get written approval first, some landlords are open to trim upgrades a tenant pays for and leaves behind, but this varies enough that it's worth confirming before starting any of these five specifically.
Homeowners have full flexibility across all nine and can treat this list as a rough phased project, tackling the least expensive, most reversible changes first before committing to the larger trim and casing work.
Staying Under Budget
Decide which of the nine changes matters most for your specific room before starting anything. A room with decent trim but plain plastic hardware and a bare wall benefits more from the molding and hardware swaps first than from a full baseboard replacement it may not need as urgently. Prioritizing whichever single detail is most noticeable from the main seating area tends to produce a more visible improvement per dollar than spreading a limited budget evenly across all nine at once.
Track spending as the project goes rather than estimating afterward, trim and hardware purchases in particular tend to add up quickly across a whole room, a simple running list keeps the total visible in real time. Where possible, tackle the trim-focused changes, wall molding, casing, and baseboard, together in a single project phase, since the tools, primer, and paint overlap significantly across all three.
Common Mistakes
- Mixing more than one trim color or profile in the same room: consistency across molding, casing, and baseboard is what makes the whole trim package read as planned rather than piecemeal.
- Skipping the caulk step on any trim addition: a visible gap between new trim and the wall is the fastest way to make an otherwise good project look unfinished.
- Choosing a fixture or shelving pair that's undersized for the room: an overhead fixture or flanking shelves that are too small for the space read as an afterthought just as much as the plain originals did.
- Working on live electrical circuits: always confirm power is off with a voltage tester before touching any switch, outlet, or fixture wiring.
- Doing every change at once with no prioritization: tackling the highest-impact, most visible detail first tends to produce a more noticeable result than spreading a limited budget evenly across all nine simultaneously.
- Forgetting to check backset and mounting measurements before ordering hardware: mismatched hardware sizing is one of the most common and easily avoidable wasted purchases across several of these projects.
Which Change to Start With
- The walls feel completely flat and featureless: start with picture-frame molding, it's the single biggest dimensional change on this list.
- Trim and doors blend invisibly into the walls: the contrast paint job defines the room's architecture almost immediately.
- Small details throughout the room look like cheap plastic: the switch plate and vent register swap addresses this directly and cheaply.
- The ceiling light looks like a bare builder default: replacing the overhead fixture is a contained, high-visibility project.
- Windows and doors feel thin and undersized: the craftsman casing upgrade adds the most visual weight to these focal points.
- A fireplace or TV wall feels bare on either side: the flanking shelving project fills that gap with genuine function and style.
- Door hardware looks dated or mismatched throughout: a full hardware and hinge swap is a repeatable, budget-friendly project.
- The ceiling has never been considered at all: treating it as a fifth wall is the most distinctive, memorable change on the list.
- The floor-to-wall transition looks thin and weak: taller baseboard is the finishing touch that ties the whole trim package together.
Full Cost Breakdown
| Change | Total Cost |
|---|---|
| 1. Picture-Frame Wall Molding | $128 |
| 2. Trim and Door Contrast Paint | $59 |
| 3. Switch Plates and Vent Registers | $62 |
| 4. Overhead Fixture Swap | $101 |
| 5. Craftsman Window and Door Casing | $71 |
| 6. Flanking Built-In Shelving | $221 |
| 7. Door Hardware and Hinges (per door) | $40 |
| 8. Ceiling Treatment | $64 |
| 9. Substantial Baseboard | $119 |
| Total for all nine (one door for hardware) | $865 |
Every individual change lands well under a genuine remodel line item on its own, and even doing all nine at once lands far below what a professional living room remodel would typically cost, with plenty of room to trim further by skipping or scaling down whichever items matter least for your specific space.
Common Questions
Are these exact costs guaranteed everywhere? No, prices vary by region and retailer, these are realistic mid-range estimates meant as a planning benchmark, check current local pricing before finalizing your own budget.
Can several of these be combined into one project phase? Yes, the wall molding, casing, and baseboard all use similar trim materials and tools, tackling those three together as one combined trim project is an efficient way to approach the list.
Do I need to do all nine, or can I pick just a few? Skipping several is entirely reasonable, prioritizing whichever single detail is most visible in your specific room preserves most of the overall impact even on a smaller budget.
What's the best change to try first if I've never done anything like this before? The switch plate and vent register swap is the most forgiving starting point, it requires no power tools, no electrical work beyond flipping a breaker, and is fully reversible.
Do these totals assume I already own basic tools? Most totals include the specific materials needed, trim, paint, hardware, but assume a miter saw or box, a level, and basic hand tools are already available or borrowed, factor in rental costs if any of those need to be sourced.
How long does the full set of nine changes realistically take? Spread across several weekends, most people complete all nine within four to eight weeks of casual effort, with the switch plates, hardware, and fixture swap each doable in under a day.
What if the budget is closer to two hundred dollars total, not nine hundred? Focus on the switch plate and vent register swap, the trim and door contrast paint, and the door hardware for one or two doors first, those three alone meaningfully change how the room reads for well under two hundred dollars combined.
None of these nine changes required moving a wall, hiring a full renovation crew, or a remodel-sized budget. Every one of them worked as a layer added on top of the room that was already there, correcting proportion, finish, and detail rather than the underlying structure beneath them.
Start with the switch plates and vent registers this weekend, it costs the least of anything on this list, and notice how much even the smallest, most overlooked details add up once they're finally coordinated.
Then move to whichever gap is bothering you most specifically, one change at a time, tracked against a real number rather than an open-ended budget. That's the whole method behind every one of these nine changes, and there's no reason it stops here, the same underlying principles apply to the next builder-grade room in the house that's quietly been waiting on its own version of this same treatment.
Shop the Story
- picture frame molding trim kit
- semi gloss trim paint
- matte black switch plate covers
- flush mount ceiling light
- craftsman window casing kit
- tall bookshelf pair matching
- matte black door lever set
- peel and stick wallpaper ceiling
- tall primed baseboard