
10 Kitchen Updates Under $100 That Look Like a Full Remodel
A full remodel isn't the only path to a designer kitchen, here's what actually moves the needle
My kitchen was the one room in my rental I'd fully written off. Laminate counters, builder-grade hardware, a fluorescent overhead light that made everything look slightly green. I assumed changing any of it meant a renovation I couldn't afford and, as a renter, wasn't even allowed to do.
Then a friend visited and asked who'd redone my kitchen. Nobody had. I'd spent one weekend and, by my own receipts afterward, less than I expected on a handful of small, specific changes, none of them structural, none of them requiring a contractor.
A quick note before we start: a few of the stories ahead are shared as told to me directly, and a few are offered as illustrative examples to make a principle easier to picture, I've tried to be clear about which is which rather than presenting every anecdote as independently verified. A practical note on the budget itself: choosing a handful of these rather than all ten is realistically how most people stay near the $100 mark; tackling all ten thoroughly in a larger kitchen may land somewhat higher depending on your specific space and choices.
Here are the ten updates that actually changed how the room felt, roughly in order of impact per dollar spent.
Table of Contents
- Swap Cabinet Hardware for a Cohesive Set
- Peel-and-Stick Backsplash Tile
- Paint Cabinet Interiors Behind Open Shelving
- Add Battery-Operated Puck Lights Under Cabinets
- Swap Outlet and Switch Plates to a Matching Finish
- Remove One Cabinet Door for Instant Open Shelving
- Add a Runner Rug for Warmth and Color
- Replace the Faucet Aerator and Handle Insert
- Style Open Counter Space With a Curated Display
- Add Cohesive Drawer and Shelf Liner
- Which Update to Do First If Your Budget Is Tight
- The Full Cost Comparison
- Common Questions
Swap Cabinet Hardware for a Cohesive Set
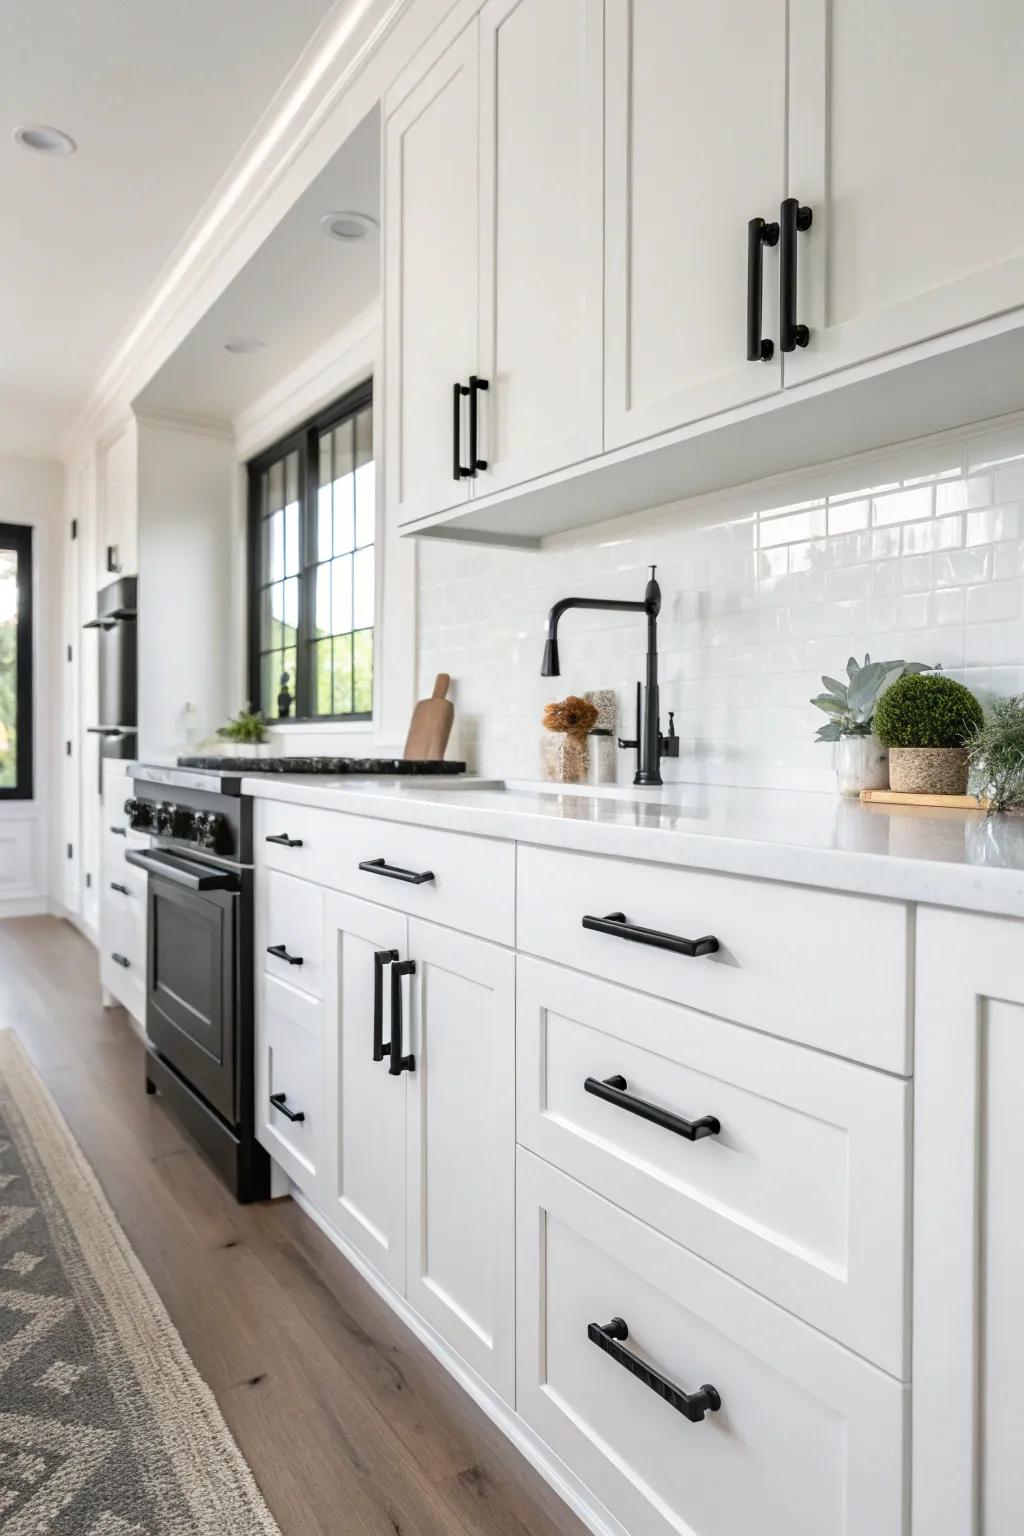
My cabinets came with a mismatched collection of knobs, at least three different finishes, none matching, some clearly replaced individually over the years by past tenants. Swapping every single one for a single cohesive style was, without question, the highest-impact change I made in the entire kitchen.
- Count every knob and pull in the kitchen and measure the screw spacing on any pulls (not knobs) to ensure new hardware matches existing holes.
- Choose one consistent finish, matte black, brushed brass, or brushed nickel, throughout the entire kitchen.
- Remove old hardware with a simple screwdriver, keeping screws organized by cabinet if reusing any.
- Fill any mismatched screw holes from a hardware swap with wood filler before installing new pieces if hole spacing changes.
- Install new hardware in one dedicated session, the whole kitchen at once reads as far more transformative than a gradual swap.
- Removes the single most common "mismatched" signal in a kitchen
- Takes a single afternoon with basic tools
- Fully reversible, keep your old hardware to reinstall at move-out
Search terms: "cabinet knobs bulk pack," "matte black cabinet pulls," "brushed brass cabinet hardware"
Peel-and-Stick Backsplash Tile
A homeowner shared that she'd wanted a tiled backsplash for years but assumed it meant hiring a tile installer. She covered her existing plain wall with peel-and-stick tile panels in a single evening, and said the transformation alone made the whole kitchen feel finished for the first time.
- Clean and fully degrease the wall surface, kitchen walls accumulate cooking residue that weakens adhesion.
- Measure your backsplash area precisely and buy slightly more material than the exact calculation for pattern matching at seams.
- Start from a corner or the most visible edge, working outward in sections.
- Press firmly and use a smoothing tool to eliminate air bubbles as you go.
- Trim carefully around outlets and switches with a sharp utility knife for a clean, finished edge.
- Achieves a genuinely tiled look without grout work or installers
- Fully removable for renters at lease end
- One of the most dramatic visual changes on this entire list
Search terms: "peel and stick backsplash tile," "removable kitchen backsplash," "subway tile peel and stick"
Paint Cabinet Interiors Behind Open Shelving
Imagine a reader with one glass-front cabinet whose plain white interior made every dish inside look slightly dingy under her kitchen lighting. Painting just the interior back panel a rich, deep color turned that same cabinet into a genuine styling feature.
- Empty the cabinet completely and clean the interior surface thoroughly.
- Lightly sand glossy surfaces so paint adheres properly.
- Choose a rich, saturated color, deep green, navy, or terracotta tend to photograph and read especially well behind neutral dishware.
- Apply painter's tape carefully along any edges meeting the unpainted exterior cabinet frame.
- Allow full cure time, typically several days, before restocking dishes to avoid tackiness marking your items.
- Uses a tiny amount of paint for a large visual impact
- Turns storage into an intentional styling feature
- Easily repainted again later if your taste changes
Search terms: "sample size paint pot," "cabinet interior paint," "small paint brush kit"
Add Battery-Operated Puck Lights Under Cabinets
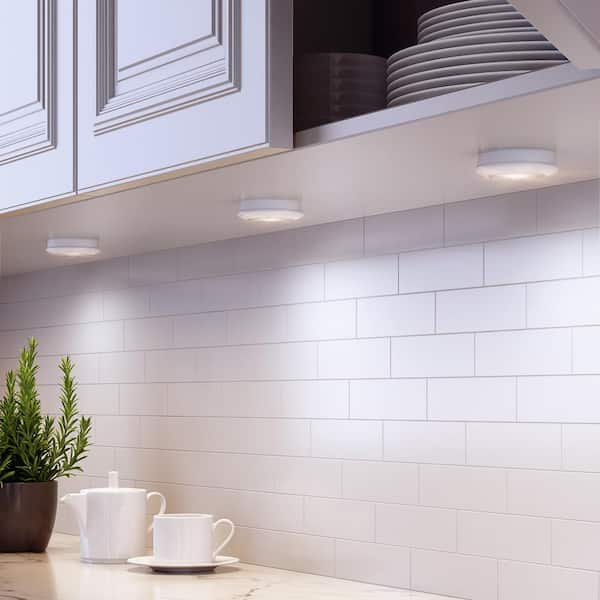
My counters were lit almost entirely by one overhead fixture across the room, leaving the actual countertop workspace in noticeable shadow every evening. Battery-operated puck lights under the upper cabinets fixed this in about ten minutes with zero wiring involved.
- Clean the underside of upper cabinets where lights will mount.
- Space puck lights evenly along the counter's most-used prep areas first.
- Press adhesive mounts firmly and hold for the manufacturer's recommended time.
- Choose warm white lights (2700K-3000K) to match the room's overall lighting tone.
- Test lighting in the evening specifically, daytime natural light can mask gaps that become obvious after dark.
- Adds genuine task lighting exactly where cooking happens
- Zero wiring or electrician required
- Instantly makes counters feel more considered, not just lit
Search terms: "battery operated puck lights," "under cabinet LED lights wireless," "rechargeable puck lights kitchen"
Swap Outlet and Switch Plates to a Matching Finish

One homeowner shared that after updating her cabinet hardware to matte black, her plain white outlet covers suddenly stood out in a way she'd never noticed before, a small mismatch that became obvious only once everything else around it had been upgraded.
- Turn off power to the relevant outlets and switches at the breaker before starting, a basic safety step worth never skipping.
- Remove existing cover plates with a simple screwdriver.
- Choose replacement plates in the same finish as your new cabinet hardware for a cohesive look throughout.
- Install new plates, checking they sit flush against the wall.
- Restore power and test each outlet and switch functions normally before considering the job finished.
- Ties hardware finishes together throughout the room
- Extremely inexpensive relative to the visual consistency gained
- Takes well under an hour for a full kitchen
Search terms: "matte black outlet covers," "brushed nickel switch plate," "outlet cover multipack"
Remove One Cabinet Door for Instant Open Shelving

The single genuinely free update on this entire list: removing one upper cabinet door entirely turns that cabinet into open shelving, a look normally associated with a real renovation, achieved with nothing but a screwdriver.
- Choose one cabinet, ideally at eye level, in a spot where styled items will actually be seen.
- Unscrew the hinges carefully, keeping hardware labeled and stored in case you want to reverse this later.
- Paint the newly visible interior if desired, per Idea 3, for a more finished look.
- Style the shelf with a curated, uncluttered selection of dishware, rather than simply leaving everyday clutter visible.
- Reinstall the door in seconds at move-out or whenever you want the change reversed.
- Genuinely free, uses only what you already own
- Fully reversible in under a minute
- Creates a designer-associated look at zero cost
Search terms: "open shelving styling ideas," "kitchen cabinet interior paint," "small screwdriver set"
Add a Runner Rug for Warmth and Color
A bare kitchen floor, even a genuinely nice one, reads as slightly clinical without any textile softening it. A single runner rug in front of the sink was one of the least expensive updates on this list and one of the most immediately noticeable.
- Measure the space in front of your sink and stove specifically, the two areas you stand longest.
- Choose a washable, low-pile rug suited to kitchen spills and foot traffic.
- Select a color that repeats or complements something already in the room, cabinet hardware tone, wall color, or dishware.
- Use a non-slip pad underneath for safety, especially on hard flooring.
- Wash regularly per the product's care instructions, kitchen rugs accumulate grease and spills faster than other rooms' rugs.
- Softens a hard, clinical-feeling floor instantly
- Adds color and pattern tying the room's palette together
- Genuinely improves standing comfort during cooking
Search terms: "washable kitchen runner rug," "non slip rug pad," "kitchen mat sink"
Replace the Faucet Aerator and Handle Insert
I assumed my dated-looking faucet meant a full replacement, a cost I genuinely couldn't justify. A closer look revealed the actual fixture was fine, it was a scaled-up, tarnished aerator tip and a worn handle insert quietly making the whole thing look older than it was.
- Unscrew the aerator tip at the very end of the faucet spout by hand or with pliers wrapped in a cloth to avoid scratching.
- Clean any mineral buildup from the faucet threads before installing a new aerator.
- Check your faucet handle for a small decorative cap or insert that may be removable and replaceable separately from the full handle.
- Match new components to your faucet's specific brand and model where possible for a proper fit.
- Test water flow and check for leaks after reassembly before considering the job complete.
- Addresses the actual source of a "dated" look, often overlooked
- Costs a fraction of full faucet replacement
- Simple enough for most people to do without a plumber
Search terms: "faucet aerator replacement," "faucet handle insert kit," "kitchen faucet parts"
Style Open Counter Space With a Curated Display
Imagine a reader whose kitchen counters had become a landing zone for mail, chargers, and miscellaneous clutter over months. Clearing it entirely and styling just three intentional objects, a wooden board, a small plant, a ceramic utensil crock, transformed the counter's whole feel without spending anything on the actual space.
- Clear the counter completely and designate a hidden spot elsewhere for daily clutter like mail and chargers.
- Choose two to three functional-but-attractive items, a wooden cutting board, a ceramic utensil holder, a small plant.
- Group them at one end of the counter rather than spreading them evenly across the whole surface.
- Leave the majority of counter space genuinely clear for actual food prep.
- Rotate seasonal touches (a small pumpkin in fall, fresh herbs in summer) to keep the display feeling current.
- Makes a functional space feel considered, not just used
- Often requires no new purchases, just reorganizing what exists
- Signals an intentionally designed kitchen at a glance
Search terms: "ceramic utensil crock," "wooden cutting board display," "small kitchen counter plant"
Add Cohesive Drawer and Shelf Liner
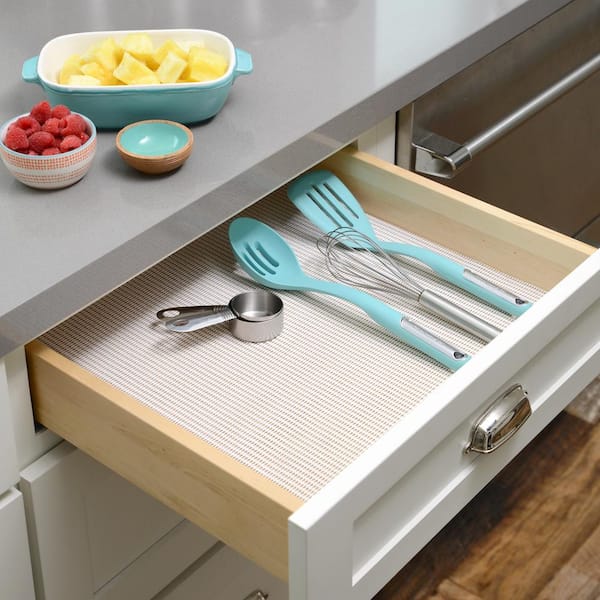
A homeowner shared that after finally organizing her drawers, mismatched, curling contact paper from a previous tenant still made every open drawer look neglected. New, cohesive liner in every drawer at once was a small, almost invisible-when-closed update that still changed how the whole kitchen felt to actually use.
- Remove all existing liner and clean drawer and shelf surfaces thoroughly.
- Measure each drawer and shelf individually, they're rarely all identical.
- Choose one cohesive pattern or color throughout, rather than whatever remnant pieces are on hand.
- Cut liner slightly oversized and trim to fit precisely once placed, rather than cutting exact measurements upfront.
- Smooth firmly from center outward to avoid trapped air bubbles under adhesive-backed versions.
- Noticed every time a drawer or cabinet opens
- Extremely low cost relative to the consistency it adds
- Protects surfaces, adding function alongside the visual update
Search terms: "kitchen drawer liner," "shelf liner non adhesive," "food safe cabinet liner"
Which Update to Do First If Your Budget Is Tight
- 1. Remove one cabinet door — genuinely free, immediate visual change.
- 2. Swap cabinet hardware — the single highest impact-per-dollar update on this list.
- 3. Swap outlet and switch plates — inexpensive and ties hardware finishes together.
- 4. Add a runner rug — low cost, immediately noticeable warmth and color.
- 5. Add battery puck lights — genuinely useful daily function, not just appearance.
The remaining five updates compound well on top of these, but this order delivers the most visible transformation if you're starting from absolute zero budget.
The Full Cost Comparison
| Update | Typical Cost |
|---|---|
| Cabinet hardware (full kitchen) | $20–60 |
| Peel-and-stick backsplash | $30–90 |
| Cabinet interior paint | $5–15 |
| Battery puck lights | $15–35 |
| Outlet and switch plates | $8–20 |
| Cabinet door removal | $0 |
| Runner rug | $20–45 |
| Faucet aerator/handle insert | $8–25 |
| Counter styling | $0–20 (using existing items) |
| Drawer and shelf liner | $10–20 |
| Choosing 4–5 updates realistically | Around $80–100 total |
Common Questions
Can I really do all ten and stay under $100? It depends heavily on kitchen size and specific product choices; choosing your top four or five from the priority list above is the more realistic way to stay near that number for most kitchens.
Which of these are safe for renters specifically? Cabinet hardware, backsplash, puck lights, rugs, and drawer liner are all fully reversible; keep original hardware and cabinet doors stored to reinstall at move-out.
Do I need any special tools? A basic screwdriver, a smoothing tool for backsplash and liner, and a small paintbrush cover nearly everything on this list.
Which update should I skip if I'm short on time, not budget? Peel-and-stick backsplash and drawer liner take the most hands-on time; hardware swaps and cabinet door removal are the fastest for a genuinely tight schedule.
A full remodel was never actually the only path to a kitchen that feels considered and current. Every update here proves the same point: a handful of specific, well-chosen small changes does more real work than waiting and saving for a renovation that may be years away.
Start with the one that costs you nothing this weekend, removing a single cabinet door, and let the momentum from that first small change carry you into the next one.
Shop the Story
- cabinet knobs bulk pack
- peel and stick backsplash tile
- sample size paint pot
- battery operated puck lights
- matte black outlet covers
- washable kitchen runner rug
- faucet aerator replacement
- ceramic utensil crock
- kitchen drawer liner
- non slip rug pad